Contents
Index
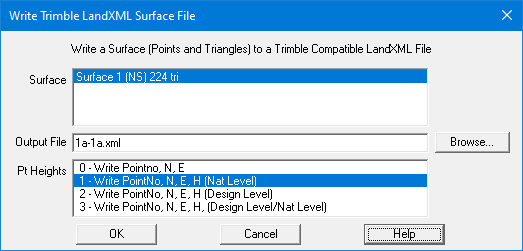
Write Trimble LandXML Surface File
This option will write a Surface to a LandXML file suitable for Trimble use.
Surface
You choose the Surface to write and the Points and Triangles will be written to the file.
You can export the Natural Surface levels (point heights) or
the Design Surface RLs if they exist on those points.
The Surfaces listed will show if they were formed with Natural Surface Levels (NS),
or with Design Surface Level Points (DS)
The number of triangles in the surface is shown.
Output File
Choose a suitable name, include the surface name.

0 - Write PointNo, N, E
This option will write XY co-ordinates with no height values
1 - Write PointNo, N, E, H (Natural Surface Level)
This option will write XYZ co-ordinates with the Natural Surface Level as the height value
2 - Write PointNo, N, E, H (Design Surface Level)
This option will write XYZ co-ordinates with the Design Surface Level as the height value
3 - Write PointNo, N, E, H (Design Level/Natural Level)
This option will write XYZ co-ordinates with the Design Surface Level,
or if there is none, it will use the Natural Surface Level
Surface File Format
This is an XML file containing the Points and the Triangles.
This is a sample of some Surface file data
   <Surfaces>
      <Surface name="ABC">
         <Pnts>
            <P id="3000">7471984.889 751695.706 350.000</P>
            <P id="3001">7472000.665 751707.998 350.000</P>
    			....
         </Pnts>
         <Faces>
            F n="5 3 4">3017 5000 3016</F>
            <F n="2 0 7">3016 5000 5003</F>
    		....
         </Faces>
      </Surface>
   </Surfaces>
Explanation
- <Surfaces> - indicates the start of Surfaces section, we only have one surface in a file
- <Surface name="Road1"> - name is the name of the surface
- <Pnts> - This is the start of the points data
- <P> - The points, Id is the point number, followed by X, Y, Z values
- <Faces> - Defines start of the triangles
- <Face> - The n="5 3 4" are the three adjacent triangles, followed by the point nubers that make this triangle
- </Surface> - end of the surface data
- </Surfaces> - end of all the surface data
How to Export your Design Data
This is an explanation of how to export your Road Design data to a Trimble
Surface file so that it can be used for machine guidance files.
- Create a Boundary string around the area of interest, usually around the road cross sections.
- Start Surfaces Dialog
- Edit the surface, Set Use = 'Design Surface Levels'.
- Set name = 'ABC Road' - this is the surface name
- Save Surface info, return to Surfaces dialog
- Click 'Use all Points' at top.
- Select the Boundary string from step 1.
- Form Triangles - you should see triangles only over the Road area.
- Start menu option Conversions/Trimble/Write Trimble LandXML Surface File
- Click the surface (ABC Road) you just created above
- Set output xml filename (abc.xml)
- Set Pt Heights = '2 - Write PointNo, N, E, H (Design Level)'
- Press Ok to write the file.
Checking the File - Part 1
The file contents will look like the example above:
- Open the file (abc.xml) with a text editor. (Notepad will do)
- Check several points - id="3000" is for point 3000.
- Check the N, E, H values are correct as per your acs job. Note that the height value should be the DESIGN Level
- You should check a few more points around the job.
Checking the File - Part 2
This will check that the correct area has been exported and the points hav ethe correct heights.
- Start a blank job with GeoSurvey
- Use the menu option Conversions/Trimble/Read Trimble LandXML Surface File
- Select the file you just exported (abc.xml), press Ok
- Free F5 to display the imported data.
- Select a point and show its' properties, the acs job point number will be in the Attributes 'id' field
- The height value will be the DESIGN Level - check it against the acs job for that point number
- Check several points across the job
- Form Contours using the triangles and the contours should be the same as the original Design Surface contours
